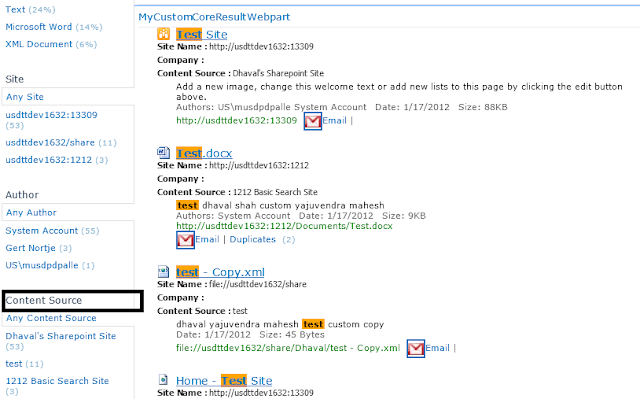
Following are the steps to add a refinement in the
refinement panel of the sharepoint page.
Extract XML of the Filter Category Definition
we need to extract the xml of the
Filter Category Definition from the existing default refinement panel.
A. In your browser, navigate to the results page URL:
http://SiteURL/Pages/results.aspx
B. On the Site Actions menu,
click Edit
Page.
C. In the Refinement Panel Web Part, click the edit arrow to display
the Web Part menu, and then click Edit Web Part.
This opens the Web Part tool pane.
D. In the Refinement section,
clear the Use
Default Configuration check
box.
E. In the Refinement section,
click the ellipsis (…) button for the Filter Category Definition field.
This opens the Text Entry window for the Refinement Web Part's FilterCategoriesDefinition property. You can modify the XML
directly in this window; however, you may find it easier to copy the code to a
file.
Edit the XML in Visual Studio
Now we need to edit the given xml in visual studio
preferably. You will find a filters already present for the Result Type, Site,
Author,etc by default. We will try to add our own filter in it.
We will add ‘Content Source’ category filter to it, so that we can
filter based on the content source from which the result was crawled.
Scroll to the end of the xml and add the following
line before </FilterCategories> tag
<Category Title="Content Source" Description="Use this filter to restrict results authored by a specific
content source" Type="Microsoft.Office.Server.Search.WebControls.ManagedPropertyFilterGenerator" MetadataThreshold="1" NumberOfFiltersToDisplay="4" MaxNumberOfFilters="20" ShowMoreLink="True" MappedProperty="contentsource" SortBy="Frequency" SortDirection="Descending" SortByForMoreFilters="Name" SortDirectionForMoreFilters="Ascending" MoreLinkText="show more" LessLinkText="show fewer" ShowCounts="Count" />
|
Save back the edited XMl of FilterCategoriesDefinition in webpart
Copy back the edited xml to the webpart’s FilterCategoriesDefinition property and click ok. Now our webpart is ready to use content source as a filter. But main catch here is that content source property is not retrieved in the ContentCoreResult Webpart without which our filter will be of no use.
Copy back the edited xml to the webpart’s FilterCategoriesDefinition property and click ok. Now our webpart is ready to use content source as a filter. But main catch here is that content source property is not retrieved in the ContentCoreResult Webpart without which our filter will be of no use.
Add the column for Content Source
Add the column for “Content Source” in the ContentCoreResult webpart
A.In your browser, navigate to the results page URL:
http://SiteURL/Pages/results.aspx
B. On the Site Actions menu,
click Edit
Page.
C. In the Content Core Result Web Part, click the edit arrow to display the Web Part menu,
and then click Edit
Web Part. This opens the Web Part tool pane.
D. In the Core Results->Display Properties section, clear the Use Default
Configuration check
box.
E. In the Display Properties section,
Copy the fetched Properties in visual studio editor
F. Now add
the following line at the end of the document before </Columns> tag and save the webpart properties
<Column Name="contentsource"/>
|
Make sure there is an entry for the managed property content source mapped to the crawled property Content Source


It's very helpful ...Thanks for sharing with us..:)
ReplyDelete