-->

Tuesday, 27 March 2012

Add Rating Stars to the Search Results

I Hope you found my previous article on Encoding and Decoding Refiner Values useful. In this article I will Explain to how to Add Rating Stars to the search results. Please let me know if you find any issues while implementing it.

Create a Custom List and Enable Rating on it

We will start with creating the list with some dummy columns and insert some data in it. I have created a 'Employee List' whose structure looks something like this

Now we need to enable the rating to the list. Click on the list settings from the ribbon under the 'List Tools' Group and 'List' tab
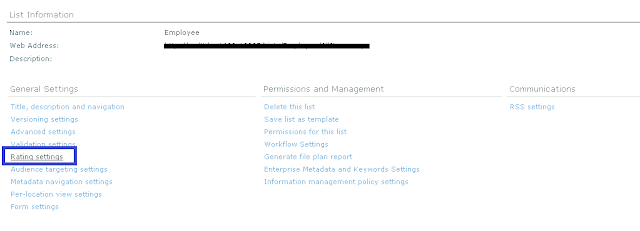
Now click on the 'Rating Settings' link under the 'General Settings' category.
Select 'Yes' under 'Allow items in this list to be rated?' and click 'Ok'.

This has successfully enabled ratings on the list and added following two columns required for rating to work.

Rating (0-5)   Rating (0-5)  
Number of Ratings   Number of Ratings 

If you go back to the list it would have added the Rating Column to the list.


Rate some Entries in the List and Run the Services for Rating

Now add rating to these entries. It wont be reflected immediately on the list, it will get updated once 'User Profile Service Application - Social Data Maintenance Job' and  
'User Profile Service Application - Social Rating Synchronization Job' jobs are executed.


This jobs are scheduled to run every hour (By default) by the sharepoint timer services. However we can change the frequency of the this jobs

Go to Central Administration -> Monitoring -> Timer Jobs -> Review job definitions

Scroll down to locate the above services


Click on each of the job and schedule it to run for every 1 min (Just so that we don't have to wait for our ratings to get updated, in normal scenario running every 

one hour is just fine !)

Once this jobs are executed successfully, the ratings that you entered previously would have started reflecting.


Start the Full Crawl of the site to Create Crawl Property


Now once we have to prepare our FAST search server to include the ratings in our search indexing.

So go to the crawled property categories and select 'Sharepoint' category. Now search for 'rating'

It should return following to crawled properties

ows_averagerating(Decimal)
ows_ratingcount(Integer)


If it does not return the above two crawled properties, You need to start full crawl of the site where your list is located.
Once the crawl is successfull, sharepoint will automatically create the above crawled properties

Create Managed Property for the Ratings


As we have the crawled property created we can create a managed property for each of them and map it to crawled property.

So you need to create following two managed property
a. Rating
b. RatingCount

Below are the details of the managed property that will help you to create a managed property.


Start the full crawl of the Site

After creating the managed property we need to full crawl the site 'AGAIN'. Yes, When we earlier crawled the site it just recognised that two more fields are available for crawling. But managed properties were not mapped so it didnt knew where to index the data.

so start the full crawl of the site, leave it as it is and proceed to the next step.

Modify Core Result Webpart and it's XSLT

Now we need to modify the search webpart of our site to display the rating stars in our search.

So go to your results.aspx and then edit the page. Now edit your core results webpart.

Under coreresultswebpart properties->Core Result -> Display Properties -> Fethced Properties
A. Include the following lines before the </Column> tag

<Column Name="Rating"/>
<Column Name="RatingCount"/>

B. Open the XSL Editor of the webpart by clicking on 'XSL Editor' button

Add the below lines of code after the Div tag of '<div class="srch-Title2">'

  <div class="srch-Description">
    <xsl:if test="rating &gt; 0">
      <b>
        <xsl:call-template name="DisplayRating">
          <xsl:with-param name="theRating" select="rating" />
          <xsl:with-param name="theRatingCount" select="ratingcount" />
        </xsl:call-template>
      </b>
      <br />
    </xsl:if>
  </div>

C. Copy the following code before the </xsl:stylesheet> tag

<xsl:template name="DisplayRating">
  <xsl:param name="theRating"/>
  <xsl:param name="theRatingCount"/>
  <xsl:if test="$theRating > 0">
    <div style="display: inline-block; padding-left: 8px;">
      <div>
        <xsl:variable name="tempTitle" select="concat($theRating, ' Stars (')"/>
        <xsl:variable name="tempTitle2" select="concat($theRatingCount, ' Ratings)')"/>
        <xsl:variable name="ratingTitle" select="concat($tempTitle, $tempTitle2)"/>

        <xsl:attribute name="title">
          <xsl:value-of select="$ratingTitle"/>
        </xsl:attribute>
        <xsl:choose>
          <xsl:when test="round($theRating) = 0 and $theRating &gt; 0">
            <xsl:attribute name="style">background-image:url(/_layouts/images/Ratings.png);cursor:default;height:16px;margin:0px;background-repeat:no-repeat;background-position:-368px 0px;width:16px;</xsl:attribute>
          </xsl:when>
          <xsl:when test="round($theRating) = 1 and round($theRating) &lt;= $theRating">
            <xsl:attribute name="style">background-image:url(/_layouts/images/Ratings.png);cursor:default;height:16px;margin:0px;background-repeat:no-repeat;background-position:-352px 0px;width:16px;</xsl:attribute>
          </xsl:when>
          <xsl:when test="round($theRating) = 2 and round($theRating) &gt; $theRating">
            <xsl:attribute name="style">background-image:url(/_layouts/images/Ratings.png);cursor:default;height:16px;margin:0px;background-repeat:no-repeat;background-position:-352px 0px;width:32px;</xsl:attribute>
          </xsl:when>
          <xsl:when test="round($theRating) = 2 and round($theRating) &lt;= $theRating">
            <xsl:attribute name="style">background-image:url(/_layouts/images/Ratings.png);cursor:default;height:16px;margin:0px;background-repeat:no-repeat;background-position:-336px 0px;width:32px;</xsl:attribute>
          </xsl:when>
          <xsl:when test="round($theRating) = 3 and round($theRating) &gt; $theRating">
            <xsl:attribute name="style">background-image:url(/_layouts/images/Ratings.png);cursor:default;height:16px;margin:0px;background-repeat:no-repeat;background-position:-336px 0px;width:48px;</xsl:attribute>
          </xsl:when>
          <xsl:when test="round($theRating) = 3 and round($theRating) &lt;= $theRating">
            <xsl:attribute name="style">background-image:url(/_layouts/images/Ratings.png);cursor:default;height:16px;margin:0px;background-repeat:no-repeat;background-position:-320px 0px;width:48px;</xsl:attribute>
          </xsl:when>
          <xsl:when test="round($theRating) = 4 and round($theRating) &gt; $theRating">
            <xsl:attribute name="style">background-image:url(/_layouts/images/Ratings.png);cursor:default;height:16px;margin:0px;background-repeat:no-repeat;background-position:-320px 0px;width:62px;</xsl:attribute>
          </xsl:when>
          <xsl:when test="round($theRating) = 4 and round($theRating) &lt;= $theRating">
            <xsl:attribute name="style">background-image:url(/_layouts/images/Ratings.png);cursor:default;height:16px;margin:0px;background-repeat:no-repeat;background-position:-304px 0px;width:64px;</xsl:attribute>
          </xsl:when>
          <xsl:when test="round($theRating) = 5 and round($theRating) &gt; $theRating">
            <xsl:attribute name="style">background-image:url(/_layouts/images/Ratings.png);cursor:default;height:16px;margin:0px;background-repeat:no-repeat;background-position:-304px 0px;width:80px;</xsl:attribute>
          </xsl:when>
          <xsl:when test="round($theRating) = 5">
            <xsl:attribute name="style">background-image:url(/_layouts/images/Ratings.png);cursor:default;height:16px;margin:0px;background-repeat:no-repeat;background-position:-160px 0px;width:80px;</xsl:attribute>
          </xsl:when>
        </xsl:choose>
      </div>
    </div>
  </xsl:if>
</xsl:template>


Click 'Ok' and save the page.

Search Results

You are ready to search for the results now ! My search page something like this 


So this brings to end of this post.

Thank you.. Have a nice day !
Happy Sharepointing !

Wednesday, 21 March 2012

Encode and Decode Refiner value from the Query URL

I hope you liked my previous post on "Adding Filter in the Refinement Panel of the Search Page". I was exploring more about how the Refinement works and I found out then whenever we hover over each filter on the refiner it shows the url value to be encoded.


Something like this,
https://search.com/pages/peopleresults.aspx?k=*&r=dttsource%3D%22AQpVUzpEU3RyZWV0CWR0dHNvdXJjZQEBIgEi%22


if we decode the above url, we will get something like this
https://search.com/pages/peopleresults.aspx?k=*&r=dttsource="AQpVUzpEU3RyZWV0CWR0dHNvdXJjZQEBIgEi"

k=* specifies that i have performed the Keyword search for "*", i.e wildcard search
r=dttsource="AQpVUzpEU3RyZWV0CWR0dHNvdXJjZQEBIgEi" specifies that the list of fiters we have applied

Here i cannot know which filter I actually applied. Also it was difficult to understand how the refinement panel constructs the query string by combination of the multiple filters.
But it's very important for me to know which filter I applied, So i developed a small utility which will encode as well as decode the refiner value.

Decode Refiner Value from Query URL


Encode the Refiner Value from the filter name and column value


You can download both the utility from here

Note: For some OS/Browsers you might have to rename the files to .exe extension

I hope this post and utility was useful to you.

Thank you. Happy Sharepointing !

Friday, 17 February 2012

FAST Search Server not Configured to the Sharepoint 2010

When I was configuring the FAST search server on my SharePoint, it got configured successfully as a standalone type. But when I tried to create the Search Service Application, to my surprise, the options to create a "FAST Search Connector" and "FAST Search Query" were missing. After Googling a bit, I realized that FAST search was installed but it was not connected to the existing SharePoint server. Even though the Sharepoint Farm properties were correctly configured during FAST installation.

After a little while I realized that License that i have was for the SharePoint Standard, and this features are included in the SharePoint Enterprise. So I was thinking to install the SharePoint again, But luckily there is an option to change your SharePoint license type from SharePoint Standard to SharePoint Enterprise.

  • Go to Central Administration -> Upgrade and Migration  and click on Enable Enterprise Features.
  • Select the radio button for the Enterprise and it will ask for the license key.(Make sure you have the license key for the SharePoint Server Enterprise)
  • Type in the Key and click OK. It will enable all the enterprise features on your SharePoint farm.

If you have new SharePoint farm then you can alternatively re install the SharePoint 2010 with the license key for the SharePoint Server Enterprise. This is pretty important screen :)
FAST Search Server not Configured to the Sharepoint 2010

Complete your installation with the SharePoint Server Enterprise license key and after the successful configuration of the FAST you will be able to see the options of the FAST Search Connector and FAST Search Query while creating a new Search Service Application.

FAST Search Server not Configured to the Sharepoint 2010

The FAST Search Service Application types are not available in a "Basic" installation.  This limitation is specific to the Beta and is planned to be removed for the final release. More information on this link.

Friday, 10 February 2012

Troubleshooting Crawl Issues for SSL Enabled Web Application

Lately I have experienced lot of issues while crawling of SSL enabled web application and wasted almost 2-3 days fixing it. So thought to share the troubleshooting steps on my blog.

Issue 1 : Ignore SSL Warnings

Error message: An unrecognized HTTP status was received. Check that the address can be accessed using Internet Explorer. (WebExceptionStatus TrustFailure The underlying connection was closed: Could not establish trust relationship for the SSL/TLS secure channel.
This happens mostly when we implement self signed certs or certs from untrusted authorities in the web servers. In order to avoid the error message and to successfully crawl contents, make  the following changes in farm level search settings in Central Administration.
  1. Go to Application Management > Search Service Application Settings > Farm Search Administration
  2. Change the setting “Ignore SSL warnings” from No to Yes
Issue 2 : Install the FAST search Certificate
The URL of the item could not be resolved. The repository might be unavailable, or the crawler proxy settings are not configured. To configure the crawler proxy settings, use Search Administration page.
Install the certificate using the following command on the Sharepoint Admin Server
.\SecureFASTSearchConnector.ps1 –certPath FASTSearchCert.pfx –ssaName “FAST Connector” –username "domain/username"

Note : The FASTSearchCert.pfx is created when you install the FAST on the server. You can locate it under <FASTSEARCH>\Data\Data_Security\cert folder. Also on the execution of the command it will ask for the certificate password, It is the password that you entered while configuring the FAST on the server.

Issue 3 : Collection not created
Failed to connect to ame.fantasia.qa:13391,ame.fantasia.qa:13391 Failed to create session with content distributor. Unknown collection 'MyCollectionTest'
This happens when collection specified the SSA is not present in the FAST database. To check if your collection exist you can execute the following command on the FAST server. 
                 Get-FASTSearchContentCollection -Name MyCollectionTest
or else you can create a new collection with the following command 
                  New-FASTSearchContentCollection -Name MyCollectionTest
For me it was not present hence gave me an error. For quick fix, i changed the collection name back to sp. Its the default collection and was already present.

Issue 4 : Access Denied to the Default Content Access Account

Access is denied. Verify that either the Default Content Access Account has access to this repository, or add a crawl rule to crawl this repository. If the repository being crawled is a SharePoint repository, verify that the account you are using has "Full Read" permissions on the SharePoint Web Application being crawled. 
This happens when the content access account does not have "Full Read" permissions on the Sharepoint web application being crawled. You can add a crawl rule to access the repository with specific account.
  1. Go to New Crawl Rule -> add the Url 
  2. Check the radio button for 
  3. Click Ok and start the crawl.
Also make sure there is an entry for DisableLoopbackCheck in the registry. 
If its not present follow the below steps :
  1. Go to command window and type regedit.exe
  2. Navigate to  HKEY_LOCAL_MACHINE\SYSTEM\CurrentControlSet\Control\Lsa
  3. Right click on LSA and create a new 32bit DWORD value
  4. Name it as "DisableLoopBackCheck" and modify its value to 1
  5. Close the registry and crawl the content.
 Issue 5 : Error communicating to the server
The crawler could not communicated with the server. Check that the server is available and that the firewall access is configured correctly. If the repository was temporarily unavailable, an incremental crawl will fix this error.
This happens when crawler is not able to connect to the server. Make sure server name is correct. Couple of steps to troubleshoot it
  1. You should be able to ping the server from the server having crawl component. Make sure there is an entry for the server in the host file under c:\Windows\System32\drivers\etc folder.
     Ping <servername>
  2. You should be able to connect to the server using telnet command
    Telnet <servername> <port number>


Adding Filter in the Refinement Panel of the Search Page


Following are the steps to add a refinement in the refinement panel of the sharepoint page.


Extract XML of the Filter Category Definition
we need to extract the xml of the Filter Category Definition from the existing default refinement panel.

A. In your browser, navigate to the results page URL:
       http://SiteURL/Pages/results.aspx
B. On the Site Actions menu, click Edit Page.
C. In the Refinement Panel Web Part, click the edit arrow to display the Web Part menu, and then click Edit Web Part. This opens the Web Part tool pane.
D. In the Refinement section, clear the Use Default Configuration check box.
Adding Filter in the Refinement Panel of the Search Page
E.  In the Refinement section, click the ellipsis (…) button for the Filter Category Definition field.
This opens the Text Entry window for the Refinement Web Part's FilterCategoriesDefinition property. You can modify the XML directly in this window; however, you may find it easier to copy the code to a file.
Adding Filter in the Refinement Panel of the Search Page


Edit the XML in Visual Studio    
Now we need to edit the given xml in visual studio preferably. You will find a filters already present for the Result Type, Site, Author,etc by default. We will try to add our own filter in it.
We will add ‘Content Source’ category filter to it, so that we can filter based on the content source from which the result was crawled.
Scroll to the end of the xml and add the following line before </FilterCategories> tag

<Category    Title="Content Source"    Description="Use this filter to restrict results authored by a specific content source"    Type="Microsoft.Office.Server.Search.WebControls.ManagedPropertyFilterGenerator"    MetadataThreshold="1"    NumberOfFiltersToDisplay="4"    MaxNumberOfFilters="20"    ShowMoreLink="True"    MappedProperty="contentsource" SortBy="Frequency"    SortDirection="Descending"    SortByForMoreFilters="Name"    SortDirectionForMoreFilters="Ascending"   MoreLinkText="show more"    LessLinkText="show fewer"    ShowCounts="Count" />


Save back the edited XMl of FilterCategoriesDefinition in webpart
Copy back the edited xml to the webpart’s FilterCategoriesDefinition property and click ok. Now our webpart is ready to use content source as a filter. But main catch here is that content source property is not retrieved in the ContentCoreResult Webpart without which our filter will be of no use.


Add the column for Content Source
Add the column for “Content Source” in the ContentCoreResult webpart
A.In your browser, navigate to the results page URL:
http://SiteURL/Pages/results.aspx
B. On the Site Actions menu, click Edit Page.
C. In the Content Core Result Web Part, click the edit arrow to display the Web Part menu, and then click Edit Web Part. This opens the Web Part tool pane.
D. In the Core Results->Display Properties section, clear the Use Default Configuration check box.
E. In the Display Properties section, Copy the fetched Properties in visual studio editor
F.  Now add the following line at the end of the document before </Columns> tag and save the webpart properties

<Column Name="contentsource"/>

 Make sure there is an entry for the managed property content source mapped to the crawled property Content Source


Adding Filter in the Refinement Panel of the Search Page

Result
    
Now go to the search site and search for the result, you will be able to see new filter added  to the refinement panel 


                      Adding Filter in the Refinement Panel of the Search Page
