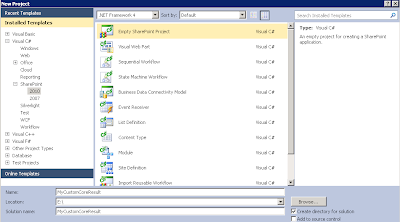
Create an empty sharepoint project
Create an empty Sharepoint Project and name it as a 'MyCustomCoreResult'
Add Custom Core Results Webpart in the project (inherit from CoreResultsWebpart)
Overriding the methods
You need to override following 3 methods
Create an empty Sharepoint Project and name it as a 'MyCustomCoreResult'

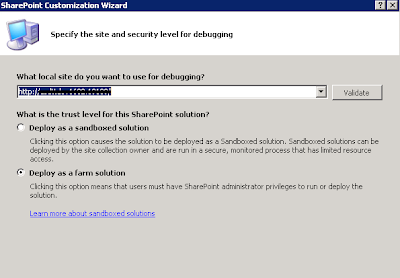
Click Ok and then enter the url of the sharepoit fast search site

Add Custom Core Results Webpart in the project (inherit from CoreResultsWebpart)
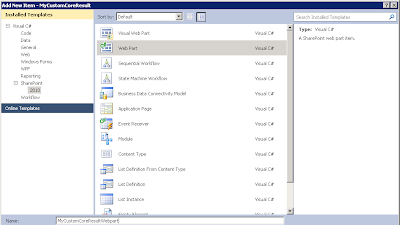
Now right click on the project and click on
add -> 'New item' -> Webpart

Enter the name of webpart as MyCustomCoreResultWebpart
and click on Add button
If you look at the Code behind file of the
webpart i.e. MyCustomCoreResultWebpart.cs, by default it would be inherited
from the Webpart class replace it with the CoreResultsWebPart
class.
Note : You might have to add the Microsoft.Office.Server.Search.dll
most likely located under C:\Program
Files\Common Files\Microsoft Shared\Web Server
Extensions\14\ISAPI\Microsoft.Office.Server.Search.dll
Overriding the methods
You need to override following 3 methods
a.
CreateChildControls
protected
override void
CreateChildControls()
{
base.CreateChildControls();
}
|
b.
OnInit
protected
override void
OnInit(EventArgs e)
{
base.OnInit(e);
}
|
c.
ChangeDataSourceProperties
protected
override void
ConfigureDataSourceProperties()
{
base.ConfigureDataSourceProperties();
this.XslLink
= "/_layouts/xsl/MyCustomCoreResultsXSLT.xslt";
}
|
Add a SharePoint Mapped Folder
Now we need to add our custom XSLT file to
the sharepoint site. Right click on the project and click on Add->Sharepoint
Mapped Folder.

Now select the appropriate folder for you
custom XSLT to reside. For our example I have selected the XSL folder under {SharepointRoot}
-> Template -> Layouts -> XSL folder. Click on Ok and it will map the
sharepoint XSL folder to our project.
Add CustomCoreResult.xslt file
Now we need to get the default xslt of the
coreresultwebpart. You can get it from here
Get the content of the xslt from the above
link and paste it in this file. You can customize the look and feel of the
webpart using this xslt. For this example we will just highlight the matched
string of the userquery with orange color.
Search for the string “c0” in the file, You
will find something like this
<xsl:template match="c0">
<b>
<xsl:value-of select="."/>
<b>
</xsl:template>
|
Replace the above section with the following one.
<xsl:template match="c0">
<span style="background-color:orange">
<b>
<xsl:value-of select="."/>
</b>
</span>
</xsl:template>
|
Build and Deploy Project
This will automatically deploy the webpart
and feature in the site you selected earlier. By default feature will be
activated. In case it’s not activated, you might have to activate it manually.
Open the site and edit the Results.aspx page to replace
the default coreresults webpart with our custom webpart from the custom
category in webpart gallery.
Save the page and now the results.aspx should be
using your webpart.

As you can see now the highlighted matches will appear in orange color. Some of the other things that you can try is adding new columns in the display results. I have added the Site Name, Company, Content Source details in the search results.
nice post!!
ReplyDelete