-->

Tuesday, 24 September 2013

Site Definition Versus Site Templates


Site Definition:

Site definitions consist primarily of multiple XML and ASPX files stored on a front-end web server in folders under the %ProgramFiles%\Common Files\Microsoft Shared\web server extensions\14\TEMPLATE\SiteTemplates directory.
-          Old & Out of Date
-          Involves managing of lot of tedious onet.xml and schema.xml files.
-          A site definition is installed on file system of web front ends
-          A site definition Page and List definition are cached at IIS process startup
 

Custom Site Templates:

 Custom web templates are stored in the database—specifically, the sandbox solutions gallery—and are created by using an existing site, with or without its specific content, as a model. This provides a means for reusing sites that you have customized.

 ***The first option for getting the SharePoint Designer changes beyond the current site is to take the site you have modified with SharePoint designer and save it as a template. You can download the template and upload this to another site collection and can create a site based on this template. Whenever you need a new site you can create it from the site template you have created. This is a good approach if the design is finalized and you want to reuse the same template in different site collections. But keep in mind you can't go back and apply the changes after the site is created. If you make any changes to the work that you did on the original site then those changes won't be reflected across the other SharePoint sites that were created from the same template. This is because each page exists separately in the SharePoint database.
 

 Major differences:

  • To create or use a site definition you need server admin access, but site template can install from web UI by site owners.
  • Site definition supports feature stapling, but for site template additional features must be activated in gallery.
  • Site definitions are stored on hard disk, but site templates are stored in content DB.
  • Site definition can provision multiple webs, but site templates are for single web only.
  • Creating site definition is relatively more complex than site template creation.
  • Performance wise Site definitions are better than site templates as files are stored on harddisk

Happy Sharepointing !

Please do Share/Like/Comment if this article was helpful.

Saturday, 7 September 2013

List Columns vs Site Columns vs Content Type


List & Library Columns

Most Popular and Easy way to create columns. It’s accessible directly from the ribbon and is available on all lists and libraries.
Advantage: Well, it’s easy to create. Within seconds
Disadvantages: It’s easy to create. Yes, The option is right there in front of you in the ribbon and will satisfy the immediate need for a column. However, it doesn’t promote reusability or help leverage what already exist in a parent site. It exists in that list or library once it’s created and that’s it.
A customer once had close to a 100 document libraries in a site. They all had one column that was exactly the same. Now to update they have to update the column in all the document libraries

Site Column

They are columns that we create in a SharePoint site to be available to its’ sub sites.
Advantages: It can be reused by multiple lists and libraries within and a site and its’ sub sites. It also helps by centralizing the configuration of the column in one place which makes it easier to update choices in a choice column for example that are used by multiple lists and libraries.
It allows all sites from a Site Collection to lookup information in a single list like a customers or manufacturers list for example.
Disadvantages: It is not so intuitive to create as the list/library column and you need administrative rights to create it. If overused, it can create a chaos amongst available sub sites. It also requires the administrator to think about his columns and architecture every time he creates one.


Content Type

A Content Type is a reusable, shareable metadata. The base type of a content type could be an existing content type like Item, Document, Folder, Event, Task, Message, Comment, Post.
Content Types are basically a way of grouping Site Columns together into a reusable group that represents some kind of content to us. For example I could group the Site Columns Invoice #, Customer and Related Product together into an “Invoice Content Type”
Example : Announcement List or Task List are basic content type provided by microsoft.
- Content Type, just like Site Columns, it is pushed to all sub sites of the designated site where it was created.
- A Content Type can only exist within a Site Collection, if you want to reuse it in another you will have to recreate it or you can use content type hub.
-  You can attach a workflow to your content type

Advantages : Content Types are necessary to organize reusable content and configurations within SharePoint. Making sure all Invoices have the same metadata and document templates for example. It can inherit from the other content types
Disadvantages : Little bit complex

Example : Suppose i have a document library for each client. one doc library for georgia pacific, one doc lib for infosys and one doc library for Cisco
Now each doc library will contain specific documents like invoice, contract agreement, sales document, etc
Here i can use site columns and it would work for me but the columns wont be tightly integrated or grouped with each document.
So its better if we create a content type for invoice doc, sales doc or contract agreement.


Content Type Hub 

Now as I mentioned earlier content type are available to only with the sites and it's subsites. Now to overcome this we have content type hub.
Content Type Hub is a central location where you can manage and publish your content types – so now web applications can subscribe to this hub and pull down the published content types from the hub

Happy Sharepointing !

Please do Share/Like/Comment if this article was helpful.

Thursday, 5 September 2013

Sharepoint Branding And Customizations - Part 3

Al right as I mentioned in my first article of this series, let's see how we can embed you tube video to your SharePoint site.

Embed YouTube Video

As difficult it sounds, its actually very easy with the content editor web-part of the SharePoint. 

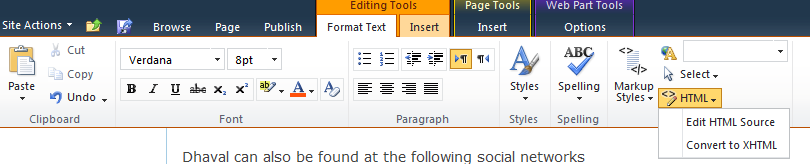
First of all add a content editor web-part to your SharePoint page. While editing the web-part, go to the Format Text option under the Editing Tools option in Robbon. Select 'Edit HTML Source' as shown below.

It will open a Dialog box to enter your HTML code.
Now go to youtube and select any video of your choice. Mine is "When you nothing say at all". Right Click on your video and select 'Copy Embed Code' as shown below


It will copy this into your clipboard

<object style="height: 390px; width: 640px"><param name="movie" value="http://www.youtube.com/v/AuJrEBtmM1Q?version=3&feature=player_detailpage"><param name="allowFullScreen" value="true"><param name="allowScriptAccess" value="always"><embed src="http://www.youtube.com/v/AuJrEBtmM1Q?version=3&feature=player_detailpage" type="application/x-shockwave-flash" allowfullscreen="true" allowScriptAccess="always" width="640" height="360"></object>

Paste the above code in the dialog box and Click ok. Save the page and you are ready to go ! 


Happy Sharepointing !


Please do Share/Like/Comment if this article was helpful.
Sharepoint 2013 - Working with Thesaurus And Synonyms

I wanted that my search center should return the results with the synonyms for the particular search keyword. I tried to do it the way we do in Sharepoint 2010.
Locate the thesaurus file from %ProgramFiles%\Microsoft Office Servers\14.0\Data\Office Server\Applications\GUID-query-0\Config, where GUID is the GUID of the new Search service application. Something like mentioned here.

It was pretty good where we had two functionalities "Replacement Sets" & "Expansion Sets", But for Sharepoint 2013 these they have eliminated it.

Below are the steps to do that in Sharepoint 2013
 1. Create a thesaurus file
 2. Install the Thesaurus file
 3. Check the results

 1. Create a thesaurus file
 Create a .csv file with the columns Key, Synonym and Language.
Key - Term (single or multiple words) that you want to trigger a synonym for when the term occurs in a query
Synonym - Synonym (single or multiple words) that you want to add to the query if the term specified in the Key column occurs in a quer
Language(Optional) - Abbreviation for the language for which the synonym should apply

This is how my thesaurus.csv file will look.


 2. Install the thesaurus File
 This can be done using powershell

$searchApp = Get-SPEnterpriseSearchServiceApplication
Import-SPEnterpriseSearchThesaurus -SearchApplication $searchApp -Filename <Path>

<Path> specifies the full UNC path of the .csv file (the thesaurus) to be imported.

3. Check The Results
As you can see in the figure, whenever i want to search for "Internet Explorer" it should return the results with "IE" or "IE5" or "IE6" or "IE7"


One more thing to note over here is, if i search for "IE" or "IE5" or "IE6" or "IE7" it will return only that particular results.


Key Points:
  1. I find the new approach in SharePoint 2013 a bit cumbersome, only good thing about it was power shell support and it does not require restart of Search service
  2. It does not have Replacement Set option, so we cannot replace the keyword search with our option. For example, I cannot replace the search with "NT5" keyword search with the "Windows 2000" and "W2K". Which was possible with SharePoint 2010
  3. It is not as extensible as expansion set. Here only one to one mapping is possible. For example, i had to write 4 entries to include the search for IE5,IE6,IE7 and IE when user searches for "Internet Explorer"
Happy Sharepointing !

Please do Share/Like/Comment if this article was helpful.

Sharepoint 2013 - Query Spelling Suggestions

Query Spelling Suggestions

When searching we sometimes spell words incorrectly. We often see it in Google, Did you mean: Sharepoint ? One of the features of SharePoint 2013 Search are Query Spelling Suggestions that process the words from the search query and control if they are spelled correctly.
In Sharepoint 2013 it is controlled using Query Spelling Suggestions, it will look something like this


There are two types of Query spelling suggestions works with two types of spelling dictionary viz Static and Dynamic mode
Dynamic - The query spelling correction uses the content-aligned dictionary
Static - The query spelling correction uses the out of the box static spelling dictionaries

You can configure the dictionary mode using the following command

$ssa = Get-SPEnterpriseSearchServiceApplication
Get-SPEnterpriseSearchQuerySpellingCorrection -SearchApplication $ssa

Set-SPEnterpriseSearchQuerySpellingCorrection -SearchApplication $ssa -SpellingDictionary Static

Query Spelling Exclusions and Query Spelling Inclusions:
SharePoint 2013 uses two Global Term Sets called Query Spelling Exclusions and Query Spelling Inclusions to define the query spelling suggestions.
1. Query Spelling Exclusions - Term Sets/Words that you never want to be suggested.
2. Query Spelling Inclusions - Term Sets/ Words that you want to be suggested

For Eg : If user searches for 'Dhawal' you know that it's incorrect spelling, so this word you can enter it in the Query Spelling Inclusions as shown below


So here whenever user searches for the 'Dhawal', 'Dhavall' or 'Dhawall', Search will ask if Did You Mean 'Dhaval'

Note : You will have to execute 'Search Custom Dictionaries Update' Timer Job so that your query spelling suggestions are reflected. 

Monday, 2 September 2013

Controlling growth using quotas

Can we control the amount of content that can be stored within a Site Collection so that it doesn’t grow beyond acceptable boundaries?
Yes, Using Quotas

What is it?
A quota specifies storage limit values for the maximum amount of data that can be stored in a site collection. Quotas also specify the storage size that, when reached, triggers an e-mail alert to the site collection administrator. Quota templates apply these settings to any site collection in a SharePoint farm.

Resource Points
Resource points correspond to specific levels of resource usage that you can define for up to 15 system resources that you want to monitor. Each of these resource measures accumulates points based on a single sandboxed solution's use of that resource, and those points are aggregated toward a quota that has been set for the whole site collection
When sandboxed code executes, certain metrics are collected such as % processor time and # of unhandled exceptions.  Timer jobs compile the metrics and calculate resource points usage.  When the total resource points used exceeds the daily limit (300 points by default), the sandbox is turned off for the entire site collection.  The following table describes the metrics collected and how they are normalized to resource points: 
Resource
Description
Units
Resources per Point
Limit
AbnormalProcessTerminationCount
Abnormally terminated process
count
1
1
CPUExecutionTime
CPU Execution Time for site
seconds
3,600
60
CriticalExceptionCount
Critical Exception Events
Events
10
3
InvocationCount
Solution Invocation Events
Events
<TBD>
<TBD>
PercentProcessorTime
% CPU usage by solution
%
85
100
ProcessCPUCycles
Solution CPU cycles
cycles
1 x10^11
1 x10^11
ProcessHandleCount
Windows handles count
items
10,000
1,000
ProcessIOBytes
Windows handles count
items
0
1 x10^8
ProcessThreadCount
Thread count in overall process
Thread instances
10,000
200
ProcessVirtualBytes
Memory consumed
Bytes
0
1.0x10^9
SharePointDatabaseQueryCount
Number of SharePoint database queries
Query instances
20
100
SharePointDatabaseQueryTime
Elapsed time to execute query
seconds
120
60
UnhandledExceptionCount
Number of unhandled exceptions
Unhandled exception instances
50
3
UnresponsiveProcessCount
Number of unresponsive processes
Unresponsive process instances
2
1

For example, if you developed a sandboxed web part that displayed data from a list, it would perform a SharePoint database query each time it loads.  20 database queries = 1 resource point, so if the web part was displayed 20 times, the site collection would have used 1 resource point.  The default site collection maximum is 300 points, so the web part could be displayed 6,000 times in a 24 hour period; after that, the sandbox is turned off until a timer job resets it.  It's important to understand is that resource quotas can be exceeded through high usage and is not necessarily an indicator of poorly written code.

About planning quota management

The basic steps to plan quota management are the following:
  1. Determine quota template settings
    There is no default quota template for site collections in a SharePoint Server 2010 environment
  1. Determine recycle bin settings
    The recycle bin can help to prevent the permanent deletion of content. The recycle bin enables site owners to retrieve items that users have deleted, without requiring administrator intervention such as restoring files from backup tapes. Key planning considerations include whether to use the second-stage recycle bin and how much space to allocate.
    The recycle bin is turned on and off at the Web application level. By default, the recycle bin is turned on in all the site collections in a Web application.
  2. Delete unused Web sites
    You can delete a quota template if you change your quota structures. However deleting a quota template does not delete quota values from site collections to which a quota template has been applied. If you want to remove quotas from all site collections that use a specific quota template, you must use the object model or perform a SQL Server query.

Key Notes about Quota Management

  1. Quotas are only applied to Site Collections
  2. You can create a default quota template at the web application level, which will be used by new site collections created moving forward.
  3. Everything in a site encompasses the Quota space: files in document libraries, items in your lists, all web parts, all images, form templates, etc…

Create Quota using Powershell

Get-SPWebTemplate | Out-File C:\SharepointWebTemplates.txt

Retreive the Current Quota settings for the site collection
(Get-SPSite -Identity "<Site Collection>").Quota
Where:
  • <SiteCollection> is the URL of the site collection
Create New Quota Template
       $quota = New-Object Microsoft.SharePoint.Administration.SPQuotaTemplate
        $quota.Name = “Dhaval”
        $quota.StorageMaximumLevel = ((10 * 1024) * 1024)
        $quota.StorageWarningLevel = ((8 * 1024) * 1024)
        $quota.UserCodeMaximumLevel = 100
        $quota.UserCodeWarningLevel = 80

        $service = [Microsoft.SharePoint.Administration.SPWebService]::ContentService
        $service.QuotaTemplates.Add($quota)

        $service.Update()

Delete Quota Template
$service =[Microsoft.SharePoint.Administration.SPWebService]::ContentService
                                $service.QuotaTemplates.Delete($QuotaTemplateName)
        $service.Update()

Configure Quota and Locks


Option 
Option Description
Unlock Not locked
NoAdditions
Unlocks the site collection and makes it available to users.
ReadOnly Adding content prevented
NoAccess
Prevents users from adding new content to the site collection. Updates and deletions are still allowed.


To lock or unlock a site collection by using Windows PowerShell
Set-SPSite -Identity "<SiteCollection>" -LockState "<State>" –QuotaTemplate “<Quota Template>”

Where:
  • <SiteCollection> is the URL of the site collection that you want to lock or unlock.
  • <Quota Template> is the name of the quota template
  • <State> is one of the following values:
    • Unlock to unlock the site collection and make it available to users.
    • NoAdditions to prevent users from adding new content to the site collection. Updates and deletions are still allowed.
    • ReadOnly to prevent users from adding, updating, or deleting content.
    • NoAccess to prevent users from accessing the site collection and its content. Users who attempt to access the site receive an error.

References:

Friday, 13 July 2012

Application Server job failed for service instance

All of a sudden, my FAST search server started bogging me this error several times.


Application Server job failed for service instance Microsoft.Office.Server.Search.Administration.SearchServiceInstance
Reason: An update conflict has occurred, and you must re-try this action


When I checked the ULS Logs it showed me the Trace below 


Application Server Administration job failed for service instance Microsoft.Office.Server.Search.Administration.SearchServiceInstance (21e4447f-bac6-4a29-82db-165e074ac5db).
Reason: An update conflict has occurred, and you must re-try this action. The object SearchDataAccessServiceInstance was updated by domain\user, in the OWSTIMER (5040) process, on machine (server name).  View the tracing log for more information about the conflict.
Technical Support Details: 
Microsoft.SharePoint.Administration.SPUpdatedConcurrencyException: An update conflict has occurred, and you must re-try this action. The object SearchDataAccessServiceInstance was updated by domain\user, in the OWSTIMER (5040) process, on machine (server name).  View the tracing log for more information about the conflict. 
   at Microsoft.Office.Server.Search.Administration.SearchServiceInstance.Synchronize()
   at Microsoft.Office.Server.Administration.ApplicationServerJob.ProvisionLocalSharedServiceInstances(Boolean isAdministrationServiceJob)


Resetting the index and Recreating the SSA didn't work either !Luckily after a lot of troubleshooting and looking around I found a fix ! Thanks to this guy !

OK , So resolution 

Resolution:
The file system cache on all FE’s (in my case, this was just one server) on which the timer service is running needs to be cleared.
Below is the step by step provided by Microsoft in this KB Article for doing this:
  1. Stop the Windows SharePoint Services Timer service (Found in Windows Services)
  2. Navigate to the cache folder
    In Windows Server 2008, the configuration cache is in the following location:
    Drive:\ProgramData\Microsoft\SharePoint\Config
    In Windows Server 2003, the configuration cache is in the following location:
    Drive:\Documents and Settings\All Users\Application Data\Microsoft\SharePoint\Config
    Locate the folder that has the file "Cache.ini"
    (Note: The Application Data folder may be hidden. To view the hidden folder, change the folder options as required)
  3. Back up the Cache.ini file.
  4. Delete all the XML configuration files in the GUID folder. Do this so that you can verify that the GUID folder is replaced by new XML configuration files when the cache is rebuilt.
  5. Note When you empty the configuration cache in the GUID folder, make sure that you do not delete the GUID folder and the Cache.ini file that is located in the GUID folder.
  6. Double-click the Cache.ini file.
  7. On the Edit menu, click Select All. On the Edit menu, click Delete. Type 1, and then click Save on the File menu. On the File menu, click Exit.
  8. Start the Windows SharePoint Services Timer service
  9. Note The file system cache is re-created after you perform this procedure. Make sure that you perform this procedure on all servers in the server farm.
  10. Make sure that the Cache.ini file in the GUID folder now contains its previous value. For example, make sure that the value of the Cache.ini file is not 1.


I Hope this article was informative. Happy Sharepointing !

Please do Share/Like/Comment if this article was helpful.


Unable To Resolve Content Distributor

I have been getting the error 'Unable to Resolve Content Distributor' when I run the Sharepoint product configuration wizard. When I googled most of the places it is given to change the content distributor in your search service application port number to 13390 instead of 13391. But my SSA was working perfectly with the 13391, so it was not an issue.


Follow the below steps and make sure your configuration is appropriate.

  1. Ping-SPEnterpriseSearchContentService -HostName hostname:portnumber
     This will display the certificates used by the service. Make sure the connectionsuccess status for the FASTSearchCert is 'True'. If it is set to false you need to install it again using 
    SecureFASTSearchConnector.ps1 script. Refer my post here.
  2. create and re-install the MOSS_STS.cer again. Execute the below commands in sharepoint management shell.

    $stsCert = (Get-SPSecurityTokenServiceConfig).LocalLoginProvider.SigningCertificate
    $stsCert.Export("cert") | Set-Content -encoding byte MOSS_STS.cer


    This will generate the certificate in the folder where you executed the command. Install this certificate using the  InstallSTSCertificateForClaims.ps1. It is located under "%FASTSearch%\Installer\scripts" folder

    InstallSTSCertificateForClaims.ps1 -certPath "certificate_path\MOSS_STS.cer"
This steps resolved my issue !

I Hope this article was informative. Happy Sharepointing !

Please do Share/Like/Comment if this article was helpful.

Monday, 25 June 2012

Sharepoint Branding And Customizations - Part 2

In my previous article Sharepoint Branding And Customizations - Part 1, we went through how to change the logo and customize our Top Navigation Menu, Viz our step1 and step 2 of our tutorial.


In this article we will proceed with our next two steps

  • Customize your Quick Launch on Left Navigation Bar
  • Add Social Icons
3. Customize your Quick Launch on Left Navigation Bar

As we modified the styles for the top Navigation bar we will add the style for the left navigation as well. But in addition to that we will add accordion to the Left Navigation Bar using JQuery. First lets start with our styling.

Copy the following code-snippet under the <Head> tag of your V4.master page. Avoid merging this style tag with the previous style tag of our Top Navigation Bar, to make the code more readable for future reference

<style type="text/css">
        /* --------- Quicklaunch ----------- */
        .ms-quickLaunch
        {
            padding-top: 0px;
        }
        #s4-leftpanel-content
        {
            background-color: transparent !important;
        }
        #s4-leftpanel-content
        {
            border: 0px !important;
            background-color: transparent !important;
        }
        .s4-ql
        {
            background-color: #fff;
            margin-bottom: 0px !important;
        }
        /* Inner nav element */
        .menu-vertical
        {
            padding: 0px !important;
        }
        /* top rounded */
        #QLtopwrapper
        {
            background: url('/Style%20Library/Images/QLtop.png') repeat-x;
            height: 19px;
            width: 220px;
        }
        /* bottom rounded */
        #QLbottomwrapper
        {
            background: url('/Style%20Library/Images/QLbottom.png') repeat-x;
            height: 19px;
            width: 220px;
        }
        .menu-vertical > ul.root > li.static > .menu-item
        {
            border-bottom: 1px #929292 solid !important;
            padding-left: 0px;
            color: #fff;
            font-family: Arial;
            font-size: 11px;
            font-weight: bold;
            background-color: #00557B !important;
            background-color: #00557B !important;
        }
        .menu-vertical > ul.root > li :hover
        {
            color: #000000;
            background: -webkit-gradient(linear, left top, left bottom, from(#0087C1), to(#ffffff));
            background: -moz-linear-gradient(top, #0087C1, #ffffff);
        }       
        /* Selected */
        .s4-ql a.selected
        {
            background-color: transparent;
            background-image: none;
            border: 1px transparent solid !important;
            color: #fff !important;
        }
        /* no border in teamsites */
        .s4-ql, .s4-specialNavLinkList
        {
            border: 0px !important;
        }
        .menu-vertical > ul.root > li.static
        {
            padding: 0px !important;
            margin: 0px !important;
        }
        /* headers */
        .menu-vertical > ul.root > li.static > a.menu-item
        {
            padding: 10px 4px 10px 5px;
            border-bottom: 1px #ccc solid;
        }
        /* headers selected for publishing sites */
        .menu-vertical > ul.root > li.static > a.selected
        {
            padding: 10px 4px 10px 3px;
            padding-left: 4px !important;
            background-color: #777 !important;
        }
        /* Subitem container */
        .menu-vertical > ul.root > li.static > ul
        {
            margin-bottom: 0px;
            padding-top: 0px;
            padding-bottom: 0px;
        }
        /* SubItems wrap */
        .menu-vertical > ul.root > li.static > ul.static > li.static > a
        {
            font-family: Arial, Helvetica, sans-serif;
            font-size: 11px;
            padding: 10px 4px 10px 8px;
            color: #ccc !important;
        }
        /* SubItems  */
        .menu-vertical > ul.root > li.static > ul.static > li.static > a > span > span
        {
            color: #333;
            text-decoration: none !important;
        }
        /* SubItems hover */
        .menu-vertical > ul.root > li.static > ul.static > li.static a:hover
        {
            text-decoration: none !important;
            background-color: #0087C1; /* fallback */
            color: #000;
        }
        /* Selected SubItems  */
        .menu-vertical > ul.root > li.static > ul.static > li.selected > a.selected
        {
            background-color: #fff;
            border: 1px transparent solid !important;
            padding-left: 10px !important;
        }
        /* Selected SubItems  */
        .menu-vertical > ul.root > li.static > ul.static > li.selected > a.selected > span > span
        {
            color: #000;
        }
        .menu-vertical > ul.root > li.static > ul.static > li
        {
            border-bottom: 1px #8C8C8C solid !important;
        }
    </style>

This will add the styling to your left navigation bar with the hover effect, But still we need to add accordion style to it.

Copy the following code-snippet to your <Head> tag of V4.master page
<script type="text/javascript" src="../../Style Library/jsapi.js"></script>
    <script type="text/javascript">
        $(document).ready(function () {
            $("div.menu-vertical>ul.root>li.static>a").toggle(
            function () {
                $(">ul", $(this).parent()).show("fast");
            },
            function () {
                $(">ul", $(this).parent()).hide("fast");
            }
            );
            $("div.menu-vertical>ul.root>li.static>ul.static").css("display", "none");
            var s = $("div.menu-vertical>ul.root>li.static>ul.static>li.selected").parent();
            var p = s.parent();
            p.find('ul').css("display", "");
        });
    </script>


If you look through the above code-snippet you will find that we have made reference to jsapi.js file. You can find this jsapi.js file over here. Download this file and upload it to the Style Library Folder and you are good to go. (You can upload it to different location also but do not forget to update the location in this code-snippet)

Check-In the Master page, And your Left Navigation Quick Launch is ready with the Accordion Effect !

4. Add Social Icons

Now a days Everyone is going social, so its necessary to market your brand on the social networking sites like Facebook, Twitter, Linked-In and so on. This way has been proved very useful to market your business/site.

You can get the icons used in this example from here. Upload the icons into the Style Library/Images folder of your site.

Now again we will be playing with the CSS again.

Copy the below code-snippet and paste it in the <Head> tag of your V4.master page
<style>
        #social
        {
            margin-bottom: 0px;
            position: relative;
            float: right;
            width: 300px;
            margin-right: 10px;
            height: 50px;
        }
        #social UL
        {
            padding-bottom: 0px;
            list-style-type: none;
            margin: 0px;
            padding-left: 0px;
            padding-right: 0px;
            list-style-image: none;
            padding-top: 0px;
        }
        #social LI
        {
            float: left;
            margin-left: 2px;
            display: inline;
        }
        #social A
        {
            text-indent: -99999px;
            width: 55px;
            display: block;
            height: 55px;
        }
        #social-fl A
        {
            background-position: 0px 0px;
        }
        #social-fb A
        {
            background-position: -88px 0px;
        }
        #social-tw A
        {
            background-position: -95px 0px;
        }
        #social-rss A
        {
            background-position: -143px 0px;
        }
        #social
        {
            margin-top: 0px;
            float: right;
        }
        #social UL
        {
            padding-bottom: 0px;
            list-style-type: none;
            margin: 0px;
            padding-left: 0px;
            padding-right: 0px;
            list-style-image: none;
            padding-top: 0px;
        }
        #social LI
        {
            float: left;
            margin-left: 2px;
            margin-right: 10px;
        }
        #social LI A
        {
            text-indent: -99999px;
            width: 48px;
            display: block;
            background-repeat: no-repeat;
            height: 48px;
        }
        #social-tw
        {
            background-image: url('/Style%20Library/Images/twitter4_512.png');
        }
        #social-li
        {
            background-image: url('/Style%20Library/Images/linked_in.png');
        }
        #social-fb
        {
            background-image: url('/Style%20Library/Images/facebook.png');
        }
        #social-rss
        {
            background-image: url('/Style%20Library/Images/google_plus.png');
        }
        #social-blog
        {
            background-image: url('/Style%20Library/Images/blog.png');
        }
    </style>


At this point we have just prepared the style, now we acctually need to add it in our Body of our V4.master page.

Locate the <td class="s4-socialdata-notif"> tag in your master page and add the below EXACT code-snippet ABOVE this tag.

<td>
        <div id="social">
            <ul>
                <li id="social-tw"><a title="Follow us on Twitter" href="https://twitter.com/BeingDhavalShah">
                    Twitter</a></li>
                <li id="social-li"><a title="Link up with us on Linked In" href="http://in.linkedin.com/pub/dhaval-shah/22/8b0/280">
                    LinkedIn</a></li>
                <li id="social-fb"><a title="Friend us on Facebook" href="https://www.facebook.com/dhaval.shah01">
                    Facebook</a></li>
                <li id="social-rss"><a title="Connect on Google Plus" href="https://plus.google.com/114652325732564196178/posts?hl=en">
                    Google Plus</a></li>
                <li id="social-blog"><a title="Dhaval Shah's Blog" href="http://kalashnikovtechnoblogs.blogspot.com">
                    Blog</a></li>
            </ul>
        </div>
    </td>


Save/Check In your master page, and you can see the Social Networking icons located right above the Top Navigation Bar !
You can customize it to add/remove the icons according to your choice.

My next article will be end of this tutorial(Hopefully) !

Stay tuned ! Happy SharePointing !

Please do Share/Like/Comment if this article helped you, author really appreciates.